Introducing Webhooks: Connect onWebChat to Your Own Systems in Real Time
Your live chat is where a lot of important things happen: a new conversation starts, a customer leaves their email, a chat gets rated, someone fills in the offline form overnight. Until now, that information lived inside onWebChat and you had to come and look for it.
With Webhooks, that changes. onWebChat can now push these events straight to your own server the moment they happen, so your other tools find out about them automatically.
No polling, no manual exports, no copy and paste. Something happens in a chat, and a second later your system already knows.
What Is a Webhook?
A webhook is a simple idea: you give us a URL, and whenever something happens in a chat we send an HTTP POST to that URL with a JSON body describing the event. Your server reads it and does whatever you want with it.
Think of it as onWebChat tapping your application on the shoulder and saying "this just happened, here are the details". It is the easiest way to connect onWebChat to the rest of your stack without sitting there refreshing a dashboard.
What You Can Build With Them
Once your chat events flow into your own systems, a lot of useful automations become easy:
- Sync transcripts to your CRM: when a chat closes, save the full conversation, visitor details, and labels against the right contact, automatically.
- Trigger follow-up emails: a visitor left an offline message? Kick off your own email sequence or create a support ticket without lifting a finger.
- Build custom reports: stream every chat and rating into your data warehouse and report on volume, response times, and satisfaction your own way.
- Notify another system: ping a Slack channel, update a Google Sheet, or alert your sales team when a high-value lead starts chatting.
Setting It Up Takes a Minute
Open your dashboard and go to Settings → Webhooks. From there it is straightforward:
- Click Add endpoint and paste the URL that should receive events.
- Pick which events you care about, or just choose "All events".
- Save, and you are done.
You can add several endpoints per website, then edit, disable, or delete any of them whenever you like. When you create an endpoint we generate a signing secret for it, which you use to confirm that incoming requests really came from us (more on that below).
The Events You Can Listen For
Subscribe to any combination of these events. Every message is tagged with an author of visitor, agent, ai, or trigger, so the same event covers conversations handled by your team and by the AI chatbot:
- chat.created: a new chat is started by a visitor, a trigger, the AI chatbot, or an agent.
- chat.assigned: an agent takes ownership of a chat, takes over from the AI bot, or accepts a transfer.
- message.created: a new message is sent, from the visitor, an agent, or the AI chatbot.
- chat.closed: a chat ends. The payload carries the full transcript, visitor details, and labels.
- chat.rated: a visitor rates a chat.
- offline_message.created: a visitor submits the offline form while no agent is available.
- visitor.updated: an agent updates a visitor's name, email, phone, or notes.
- visitor.banned and visitor.unbanned: an agent blocks or unblocks a visitor.
Every Delivery Is Signed
Security matters when another system can trigger actions on your end, so every request we send is signed. Each delivery includes an X-OWC-Signature header containing an HMAC-SHA256 hash of the exact request body, computed with your endpoint's signing secret.
On your side you recompute that hash with the same secret and compare. If it matches, the request genuinely came from onWebChat and was not tampered with. You also get an X-OWC-Event header with the event name and an X-OWC-Delivery id you can use to de-duplicate retries.
Verifying takes only a few lines of code. Our webhooks documentation has ready-to-use examples in Node.js and PHP.
See Every Delivery in the Dashboard
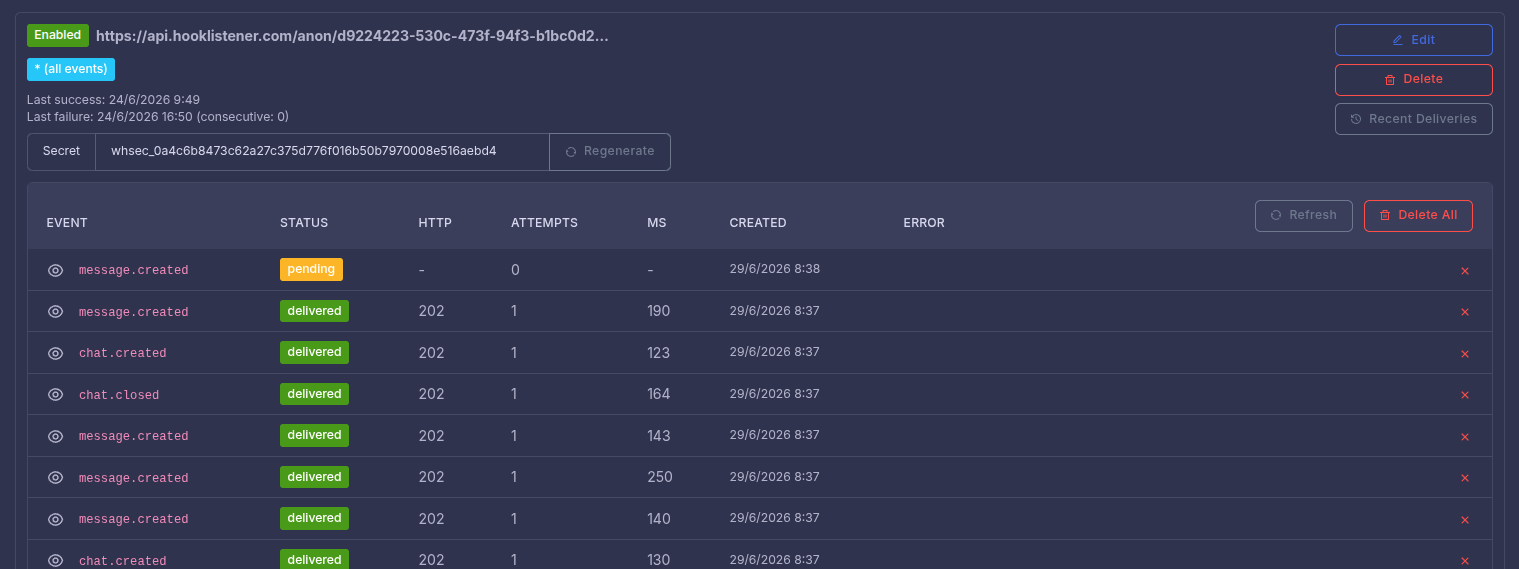
Webhooks are only useful if you can trust them, so we made deliveries easy to inspect. Each endpoint has a Recent Deliveries view that shows you exactly what was sent and how it went:
- The full payload we sent.
- The event and its delivery status.
- The HTTP status your server returned.
- The number of attempts and how long each took, in milliseconds.
- When it was created, plus any error message if something went wrong.
When you are wiring up a new integration, this is the panel you will live in. You can see at a glance whether your endpoint is responding correctly and debug a failing call without guessing.
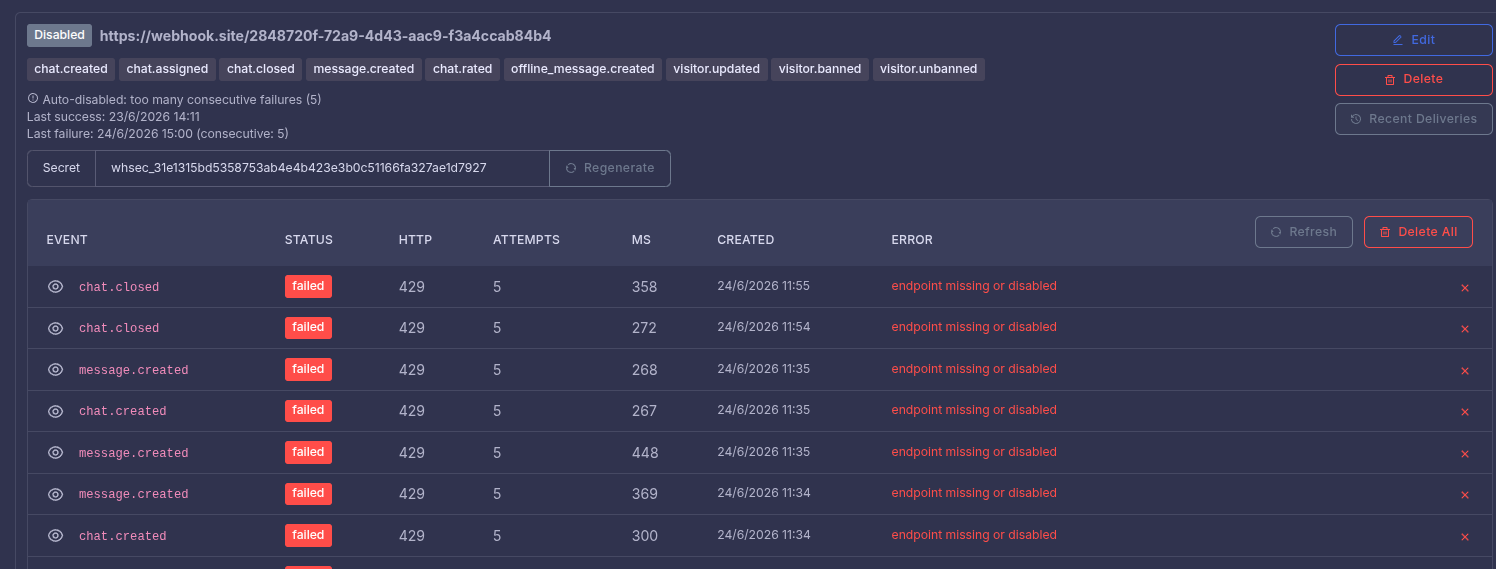
Reliable by Design: Retries and Auto-disable
Servers go down and networks hiccup, so we do not give up on the first failure. Your endpoint should answer with a 2xx status as quickly as it can. If it does not, or the request times out, we retry with an increasing delay: after 1 minute, 5 minutes, 20 minutes, 1 hour, and 2 hours.
If an endpoint keeps failing (five times in a row), we automatically disable it and let the site owner know, so we are not hammering a broken URL forever. Fix the issue, re-enable it from the dashboard, and you are back in business. If you ever want to shut an endpoint off instantly, just return HTTP 410.
A Few Tips to Get the Most Out of It
- Always verify the signature before trusting a payload.
- Respond 2xx fast, then do any heavy work in the background so you do not time out.
- Use the delivery id to de-duplicate, since a retried delivery may arrive more than once.
- Serve your endpoint over HTTPS.
- Ignore event types you do not recognize, so new events we add later never break your integration.
Available on All Paid Plans
Webhooks are available on all paid plans. If you have ever wanted onWebChat to talk to your CRM, your help desk, your data warehouse, or a script you wrote yourself, this is the bridge.
Open Settings → Webhooks to add your first endpoint, or read the full webhooks documentation for payload formats and code samples.